

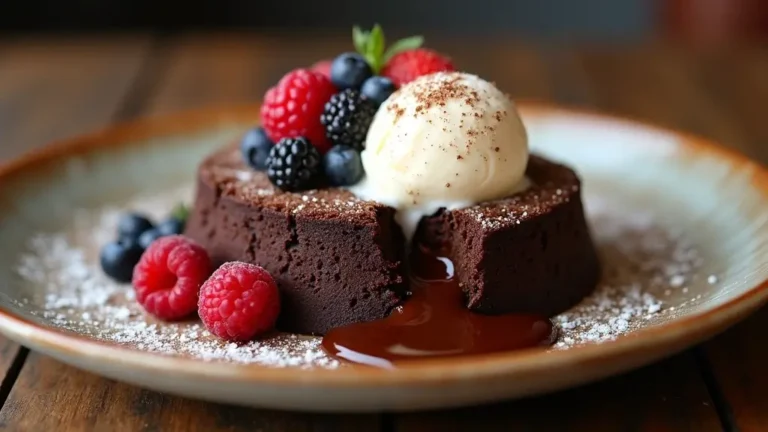
Delicious Gluten-Free Chocolate Brownies: Fudgy and Indulgent
These delicious gluten-free chocolate brownies are the ultimate indulgence for chocolate lovers.
Fudgy, rich, and deeply chocolatey, they satisfy even the most discerning sweet tooth.
I stumbled upon this recipe while searching for the perfect treat that everyone could enjoy, regardless of dietary restrictions.
Perfect for gatherings or a cozy night in, these brownies are sure to impress friends and family alike.
The History and Cultural Significance
• Gluten-free Chocolate Brownies trace their origins to the early 20th century in the United States, where they were created as a rich dessert option.
• The dish evolved over decades as more people sought gluten-free alternatives, leading to innovative recipes that maintain the classic brownie texture.
• In American culture, brownies are often served at potlucks, birthday parties, and family gatherings, symbolizing comfort and indulgence.
• While many variations exist across different regions, the authentic version maintains its fudgy texture and rich chocolate flavor that set it apart from imitations.
Recipe Overview
Nutritional Information (per serving)
Essential Equipment Guide
9×9-inch Baking Pan: A square baking pan is crucial for achieving the perfect brownie thickness. Look for one made from heavy-duty material to ensure even heat distribution and avoid overcooking the edges.
Mixing Bowls: Use glass or stainless steel mixing bowls for better temperature control and a sturdy mixing experience. Avoid plastic bowls, as they can retain heat and affect the batter consistency.
Rubber Spatula: This tool is important for folding ingredients gently without overmixing. A sturdy spatula helps scrape down the sides of the bowl, ensuring all ingredients are thoroughly combined.
Key Ingredients Explained
For Brownie Batter:
• 1 cup gluten-free all-purpose flour – Choose a high-quality blend that contains xanthan gum for optimal texture and binding, ensuring your brownies are fudgy rather than crumbly.
• 1 cup unsweetened cocoa powder – Opt for a premium Dutch-processed cocoa for a smoother flavor and deeper color, as it yields a richer chocolate experience.
For Sweetener:
• 1 cup granulated sugar – Use organic cane sugar for cleaner flavor and better sweetness balance; alternatives like coconut sugar can be used but may alter texture slightly.
• 1/2 cup brown sugar – Brown sugar adds moisture and a subtle caramel flavor, enhancing the overall taste profile.
Preparation Methods
Folding Technique: When combining wet and dry ingredients, use a gentle folding motion to avoid overmixing. This technique ensures the brownies remain light and fudgy without deflating.
Baking with Parchment Paper: Line your baking pan with parchment paper to prevent sticking and ensure easy removal. This method also helps achieve clean edges for perfectly cut brownies.
Cooling Process: Allow the brownies to cool in the pan for at least 10 minutes before transferring them to a wire rack. This step is crucial for setting the texture and making cutting easier.
Step 1: Prepare Ingredients
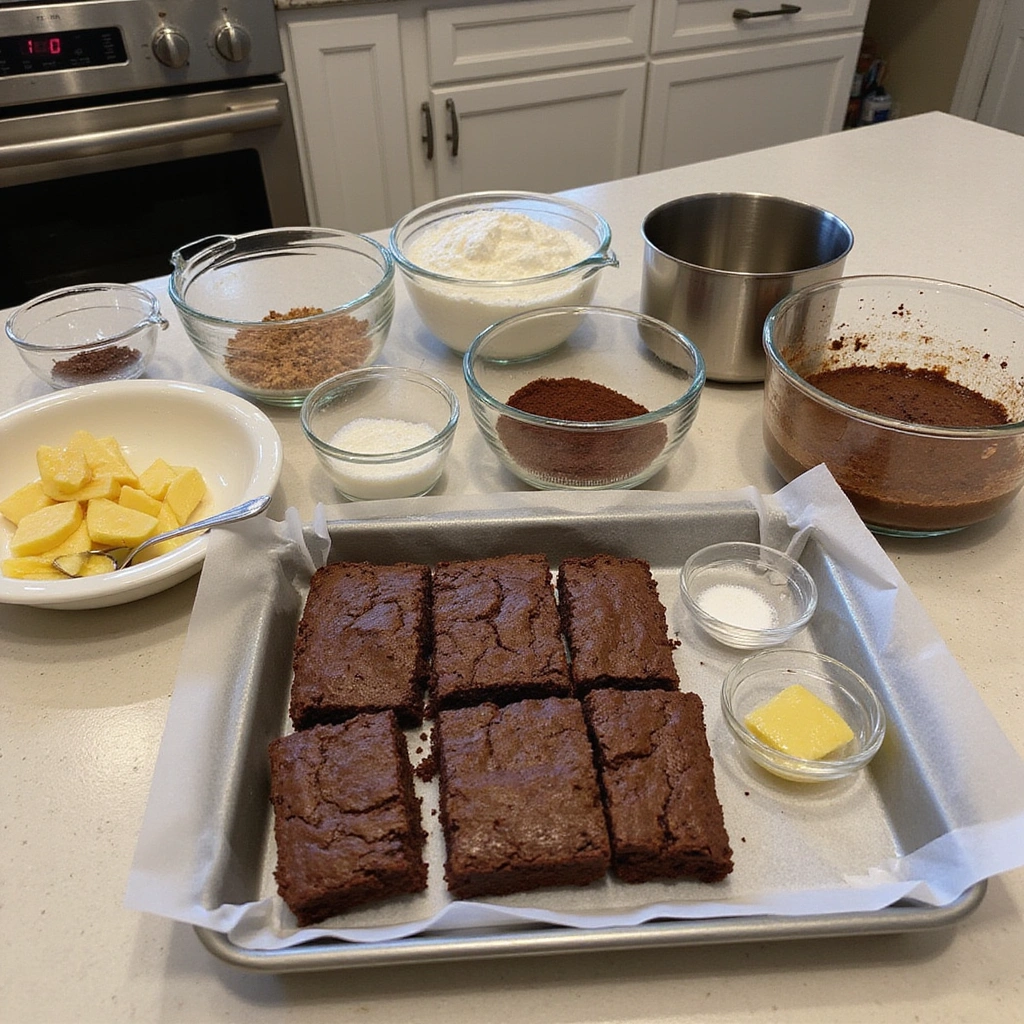
Gather all your ingredients on the kitchen counter to ensure you have everything you need.
Measure out the gluten-free flour, cocoa powder, sugars, and eggs carefully.
Preheat your oven to 350°F (175°C) to ensure it’s ready when you’re done preparing the batter.
Set out a 9×9-inch baking pan lined with parchment paper for easy cleanup.
Step 2: Mix Dry Ingredients

In a medium mixing bowl, combine the gluten-free flour, cocoa powder, and baking powder.
Whisk the dry ingredients together until fully combined, ensuring there are no lumps.
This step is crucial for an even distribution of flavors and avoiding clumps in the batter.
Set the bowl aside to focus on the wet ingredients next.
Step 3: Combine Wet Ingredients
In a large mixing bowl, beat together the eggs, granulated sugar, and brown sugar until the mixture is light and fluffy.
Add the melted butter and vanilla extract, mixing until fully incorporated.
This combination adds richness and flavor, making your brownies taste irresistible.
Make sure not to overmix at this stage to keep the batter fluffy.
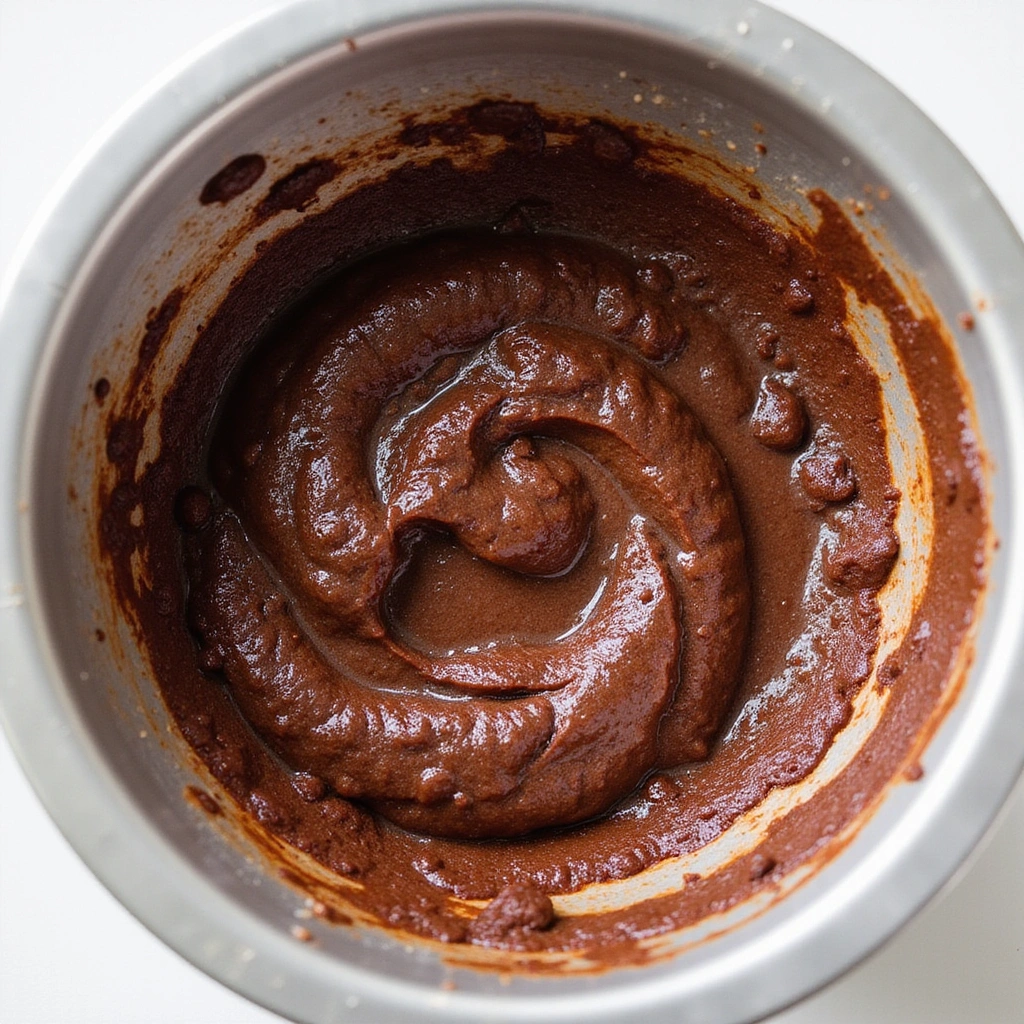
Step 4: Fold in Dry Ingredients

Gradually add the dry ingredient mixture to the wet mixture using a rubber spatula.
Gently fold the ingredients together, making sure to scrape the sides of the bowl to incorporate everything evenly.
Be careful not to overmix, as this can lead to denser brownies.
Stop mixing once no dry flour is visible, and the batter is smooth.
Step 5: Pour Batter into Baking Pan
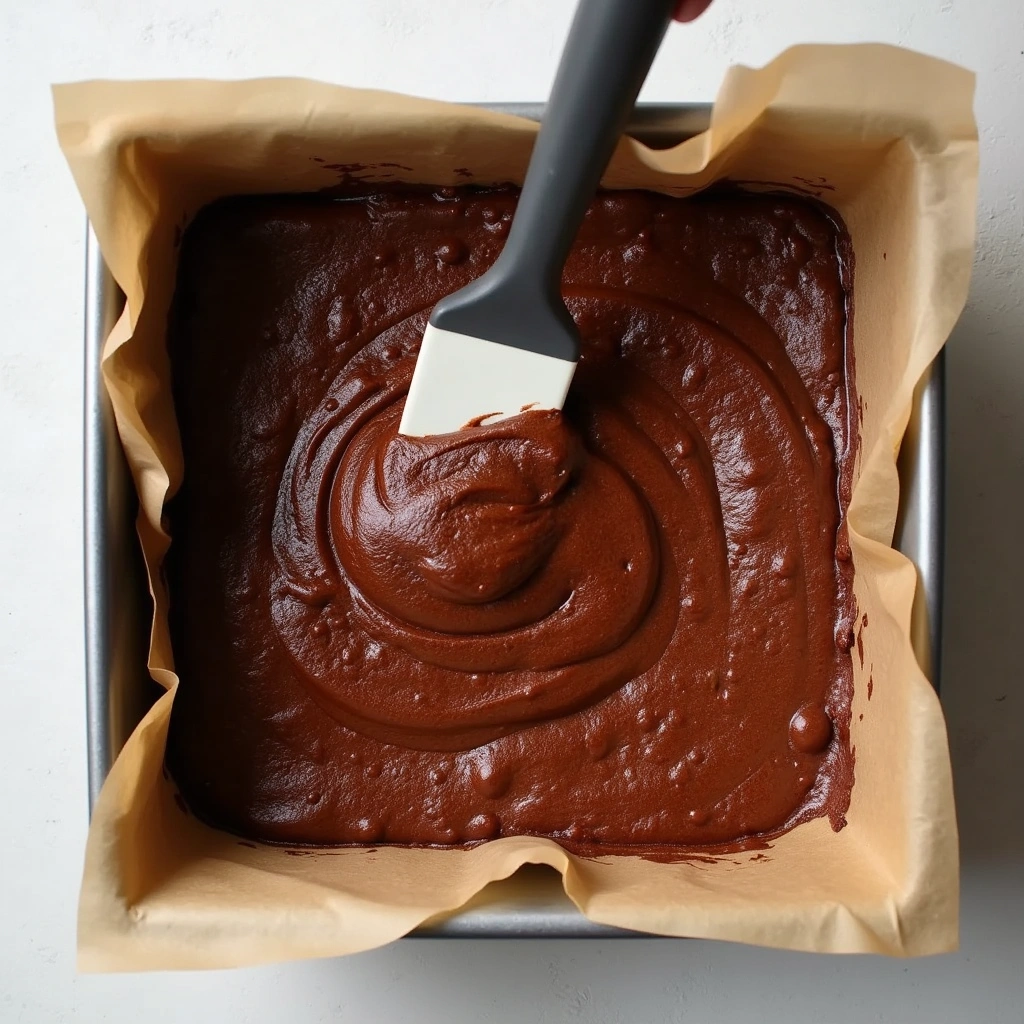
Pour the brownie batter into the prepared 9×9-inch baking pan, spreading it evenly with a spatula.
Make sure to reach the corners of the pan to ensure even baking.
This step is important for achieving a uniform bake and preventing any undercooked edges.
Smooth the top of the batter for the best appearance after baking.
Step 6: Bake the Brownies
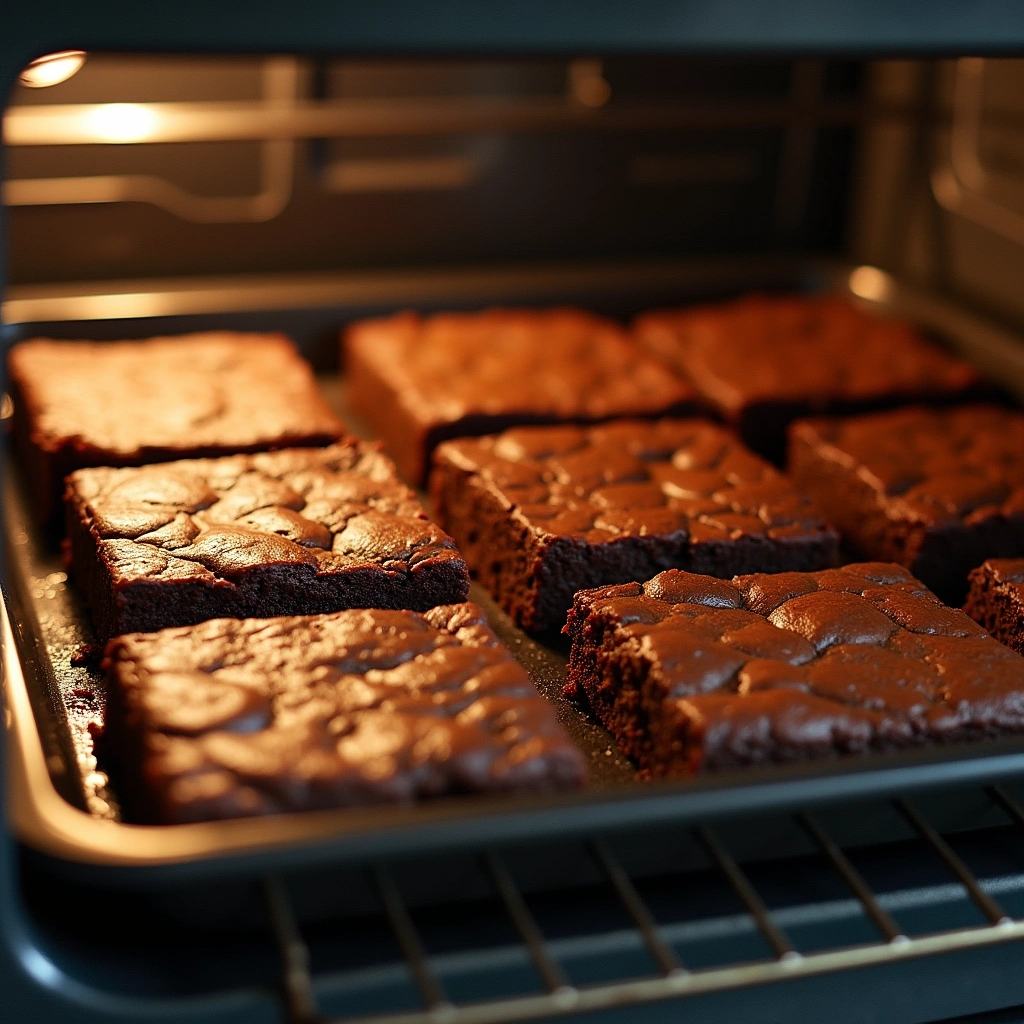
Place the baking pan in the preheated oven and bake for 25 minutes.
Keep an eye on the brownies towards the end of the baking time; they should be set but still soft in the center.
A toothpick inserted into the center should come out with a few moist crumbs, indicating they are done.
Avoid overbaking to maintain the fudgy texture.
Step 7: Cool the Brownies

Once baked, remove the brownies from the oven and let them cool in the pan for about 10 minutes.
Carefully lift the parchment paper to transfer the brownies to a wire rack to cool completely.
This cooling step is vital for setting the texture and making them easier to cut.
Allow them to cool for at least 30 minutes before slicing.
Step 8: Slice and Serve

Once the brownies are completely cooled, use a sharp knife to cut them into squares.
Wipe the knife between cuts for cleaner edges and a more professional appearance.
Serve the brownies as they are or dust with powdered sugar for a decorative touch.
Enjoy them warm with a scoop of vanilla ice cream for a decadent treat!
Critical Timing and Temperature Guide
Mixing Process: Be sure to mix wet ingredients until light and fluffy, which takes about 3-5 minutes. This aeration is key for a light brownie texture. Avoid rushing this step as it affects the final texture.
Baking Time: Bake for exactly 25 minutes or until a toothpick comes out with a few moist crumbs. Overbaking can lead to dry brownies, so check a minute or two early if unsure.
Cooling Process: Allow the brownies to cool for a minimum of 30 minutes before slicing. Cutting too soon can cause them to crumble, ruining the presentation.
Pro Tips for Gluten-free Chocolate Brownies
• Ingredient Selection: Always use a gluten-free flour blend that includes xanthan gum for the best texture.
• Preparation Secret: Let your eggs sit at room temperature for a bit before mixing; this helps achieve a fluffier batter.
• Temperature Management: Ensure your butter is melted but not hot when mixing with eggs; this prevents cooking the eggs prematurely.
• Texture Enhancement: For extra fudginess, consider adding a tablespoon of strong coffee to the wet ingredients.
• Flavor Layering: Incorporate chocolate chips into the batter for added texture and richness.
• Make-Ahead Strategies: You can prepare the batter a day in advance; just refrigerate it before baking.
• Restaurant-Quality Finishing Touches: Serve with fresh berries and a drizzle of chocolate sauce for an elevated dessert experience.
Troubleshooting Common Issues
• Brownies Too Dense: This often happens if the batter is overmixed or if too much flour is used. To avoid this, gently fold the dry ingredients into the wet mixture until just combined.
• Dry Brownies: If your brownies come out dry, they may have been overbaked. Always start checking for doneness a few minutes before the recommended time.
• Uneven Baking: This can occur if the oven is not preheated properly. Always ensure your oven has reached the desired temperature before placing the brownies inside.
• Crumbly Edges: Crumbly edges can result from cutting the brownies too soon. Let them cool completely for the best results.
• Flavor Lacking: If the brownies taste flat, consider adding a pinch of salt or a splash of vanilla extract to enhance the flavors.
Variations and Regional Differences
• Nutty Brownies: Adding chopped walnuts or pecans gives a delightful crunch and complements the chocolate flavor beautifully.
• Mint Chocolate Brownies: A touch of peppermint extract can transform these brownies into a refreshing dessert, perfect for the holiday season.
• Spicy Brownies: Incorporating a dash of cayenne pepper or espresso powder can elevate the chocolate flavor and add an unexpected kick.
• Modern Interpretations: Vegan adaptations using flax eggs and coconut oil can create a deliciously rich brownie without animal products, appealing to a wider audience.
Food Science Behind the Recipe
• Emulsification: The process of mixing fats and liquids creates a stable batter, which is crucial for achieving the desired texture in brownies.
• Maillard Reaction: This chemical reaction between sugars and proteins during baking creates the rich flavors and attractive brown color of the brownies.
• Gluten Development: In gluten-free baking, understanding how to balance ingredients is key to achieving a desirable texture without gluten’s elasticity.
Frequently Asked Questions
What’s the most common mistake people make when preparing gluten-free chocolate brownies? The most common mistake is overmixing the batter, which can lead to tough brownies. To prevent this, mix until ingredients are just combined.
Can I prepare components of this dish in advance? Yes, you can mix the dry ingredients ahead of time and store them in an airtight container. Combine the wet ingredients just before baking for best results.
How do I adapt this recipe for dietary restrictions? To make these brownies vegan, replace eggs with flax eggs and use a plant-based butter substitute.
What’s the best way to store and reheat leftovers? Store brownies in an airtight container at room temperature for up to a week. To reheat, microwave for 10-15 seconds until warm.
Can I freeze this dish? Absolutely! Wrap brownies tightly in plastic wrap and foil, then freeze for up to 3 months. Thaw at room temperature before serving.
What wine or beverages pair best with this dish? A rich red wine, such as Cabernet Sauvignon, complements the chocolate flavors beautifully.
How can I scale this recipe up for a crowd? Simply double the ingredients and bake in a 9×13-inch pan, adjusting the baking time as needed.
Serving and Presentation Guide
• Traditional Presentation: Serve brownies on a rustic wooden board, garnished with fresh mint leaves or berries for a pop of color.
• Modern Plating Ideas: Use a small white plate and stack brownie squares, drizzling with chocolate sauce and adding a scoop of ice cream on the side.
• Accompaniment Suggestions: Pair brownies with a dollop of whipped cream or a scoop of vanilla ice cream for a classic dessert experience.
• Special Occasion Presentation: For celebrations, decorate brownies with edible gold leaf or a light dusting of powdered sugar for an elegant finish.
Conclusion
These gluten-free chocolate brownies are a treat that everyone will love, regardless of dietary restrictions.
Their rich, fudgy texture and intense chocolate flavor make them an instant favorite.
I encourage you to try this recipe and enjoy the delightful results.
Happy baking!
Recipe Tags:
gluten-free
easy
dessert
vegetarian
indulgent
quick
fudgy
make-ahead
comfort-food
kid-friendly
baked
chocolate


These brownies look amazing! I’ve been trying out gluten-free recipes lately, and I think I’ll add this one to my list. What’s your favorite ingredient to sneak into desserts?
I love how fudgy these brownies look! I once made a batch and accidentally added salt instead of sugar. Let’s just say, my friends were not impressed! What’s the funniest cooking fail you’ve had?
Did you know that chocolate can actually boost your mood? It’s true! I can’t wait to try these brownies and maybe feel like a superhero for a day!
These brownies remind me of the time I made a giant batch for a family gathering. I ended up bringing home an empty dish! Everyone loved them, and I think I was the hero of the day!
That sounds amazing, Ameer! It’s great to hear that your brownies were such a hit at the family gathering. Being the hero of the day with delicious treats is always a win! Would love to hear more about your experience making them!
If you want an extra kick, try adding a splash of espresso to the batter. It really brings out the chocolate flavor! Happy baking!