

How to Make the Creamiest Homemade Aioli Sauce: A Step-by-Step Guide
The creamy whisper of a well-made aioli can elevate any dish to new culinary heights.
With its roots deeply embedded in Mediterranean cuisine, aioli offers a luscious blend of garlic and olive oil that dances on the palate.
Each spoonful of this homemade delight promises a rich, velvety texture that’s both luxurious and comforting.
Whether you’re drizzling it over seafood or spreading it on a fresh baguette, the allure of aioli lies in its simplicity and sophistication.
Join me as we delve into the secrets of crafting the creamiest homemade aioli that will leave your taste buds yearning for more.
The History and Cultural Significance
• The Creamiest Homemade Aioli traces its origins to the Mediterranean region, where it was originally created by ancient Roman chefs.
• The dish evolved over decades as garlic and olive oil became more accessible, eventually becoming the beloved version we know today.
• In Catalonian culture, this dish traditionally appears at family gatherings and summer barbecues, symbolizing warmth and togetherness.
• While many variations exist across different regions, the authentic version maintains a silky texture and robust garlic flavor that sets it apart from imitations.
Recipe Overview
Nutritional Information (per serving)
You Might Also Like

Essential Equipment Guide
Mortar and Pestle: Essential for crushing the garlic to a paste, which is crucial for the emulsification process. While a food processor can be used, the traditional method allows for better control and texture.
Whisk: Important for blending the ingredients smoothly. Look for a whisk with a comfortable handle and flexible wires.
Mixing Bowl: A wide, shallow bowl helps in whisking the aioli to the right consistency. Stainless steel or glass are preferable for their non-reactive properties.
Ingredients
For the Aioli Base
|
|
| Amount | Ingredient | Notes |
|---|---|---|
| 2 large | egg yolks | room temperature, for better emulsification |
| 1 tablespoon | lemon juice | freshly squeezed, adds brightness |
| 2 teaspoons | Dijon mustard | enhances flavor and stability |
For the Emulsion
| Amount | Ingredient | Notes |
|---|---|---|
| 1 cup | extra-virgin olive oil | slowly drizzled, forms the base |
Seasonings
| Amount | Ingredient | Notes |
|---|---|---|
| 4 cloves | garlic | crushed to a paste, adds robust flavor |
| 1 teaspoon | salt | to taste |
| 1 teaspoon | white pepper | for subtle heat |
Preparation Methods
Emulsification: This technique involves slowly incorporating oil into the egg yolk mixture, creating a thick, stable sauce. It's crucial to add the oil gradually to prevent the mixture from breaking. Mastery of this technique results in a smooth, creamy aioli.
Crushing Garlic: Using a mortar and pestle, crush the garlic cloves into a fine paste. This releases the garlic's natural oils, intensifying its flavor and ensuring it blends seamlessly into the aioli.
Whisking Techniques: Whisking is essential to combine the ingredients thoroughly. Use a circular motion and maintain a steady pace to achieve the desired consistency. A proper whisking technique prevents separation and ensures a cohesive sauce.
Step 1: Gather Your Ingredients

Collect all ingredients and equipment needed.
Ensure eggs are at room temperature for better emulsification.
Prepare a clean workspace to facilitate smooth cooking.
Double-check quantities to ensure accuracy.
Step 2: Crush the Garlic
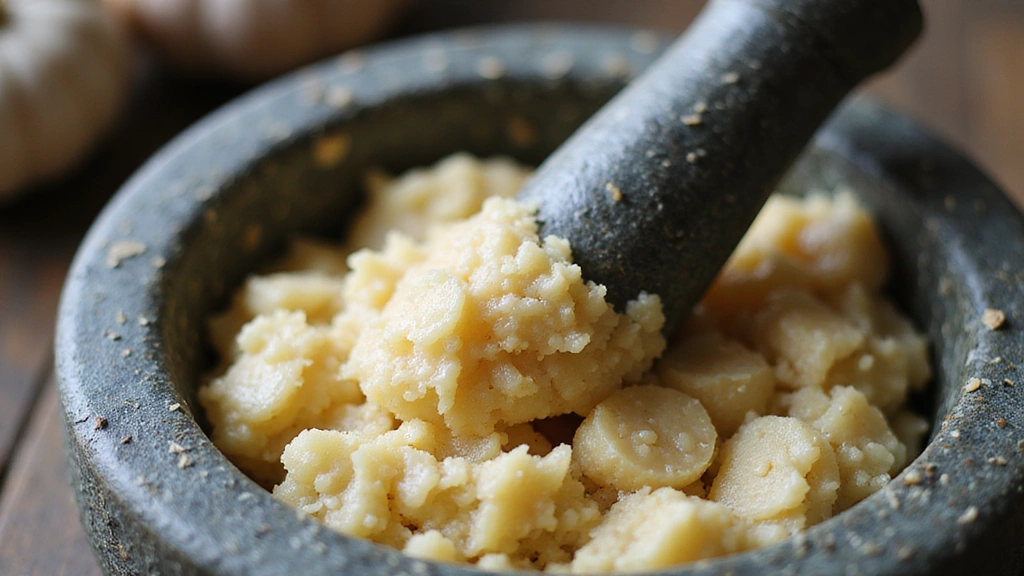
Peel and crush the garlic cloves using a mortar and pestle.
Work the garlic into a smooth paste.
Ensure there are no large pieces left, as they can affect texture.
Set aside the garlic paste for later use.
Step 3: Combine Egg Yolks and Mustard
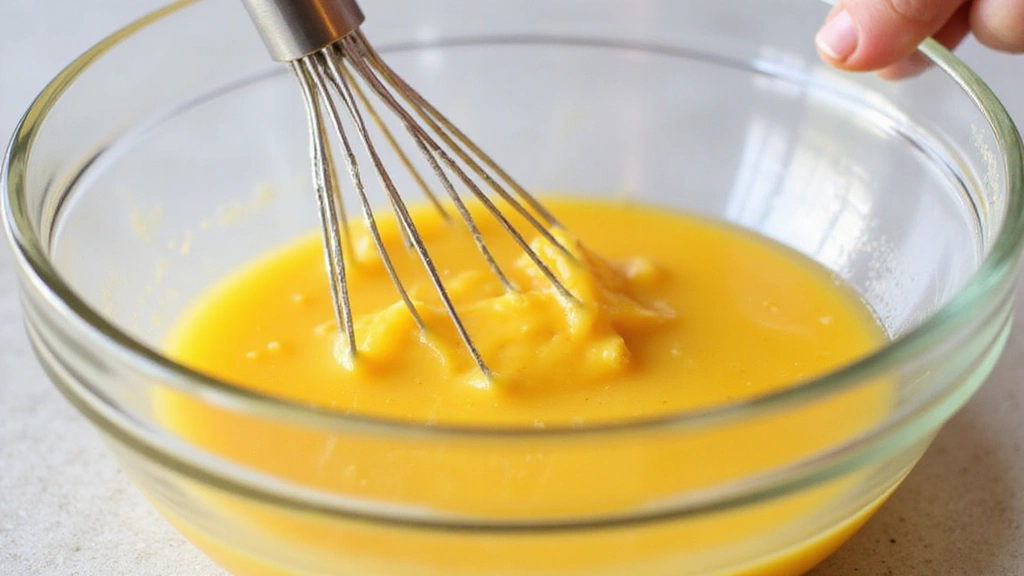
In a mixing bowl, whisk together egg yolks and Dijon mustard.
Whisk until the mixture is smooth and slightly thickened.
Ensure the mixture is homogenous before proceeding.
This forms the base for your aioli.
Step 4: Add Garlic Paste

Incorporate the garlic paste into the egg and mustard mixture.
Mix thoroughly to combine flavors evenly.
Ensure the garlic is fully integrated for consistent taste.
This step enhances the aioli's depth of flavor.
Step 5: Begin Emulsifying with Olive Oil

Start adding olive oil slowly, drop by drop, while whisking continuously.
Maintain a steady pace to create a stable emulsion.
The mixture should begin to thicken as oil is incorporated.
This step is critical for achieving the right consistency.
Step 6: Increase Olive Oil Addition

Once the mixture thickens, increase the oil to a thin stream.
Continue whisking vigorously to maintain a stable emulsion.
Watch for signs of separation and adjust speed as needed.
A steady hand ensures a smooth, creamy aioli.
Step 7: Add Lemon Juice and Seasonings
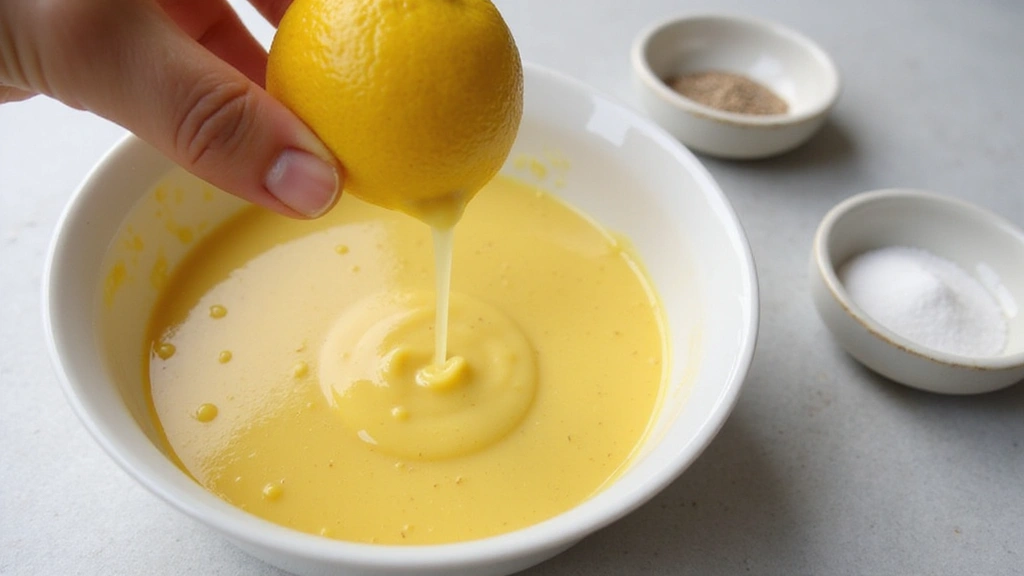
Mix in lemon juice to brighten the aioli's flavor.
Season with salt and white pepper to taste.
Adjust seasoning until the desired flavor balance is achieved.
Lemon juice also helps stabilize the emulsion.
Step 8: Final Whisk and Adjustments
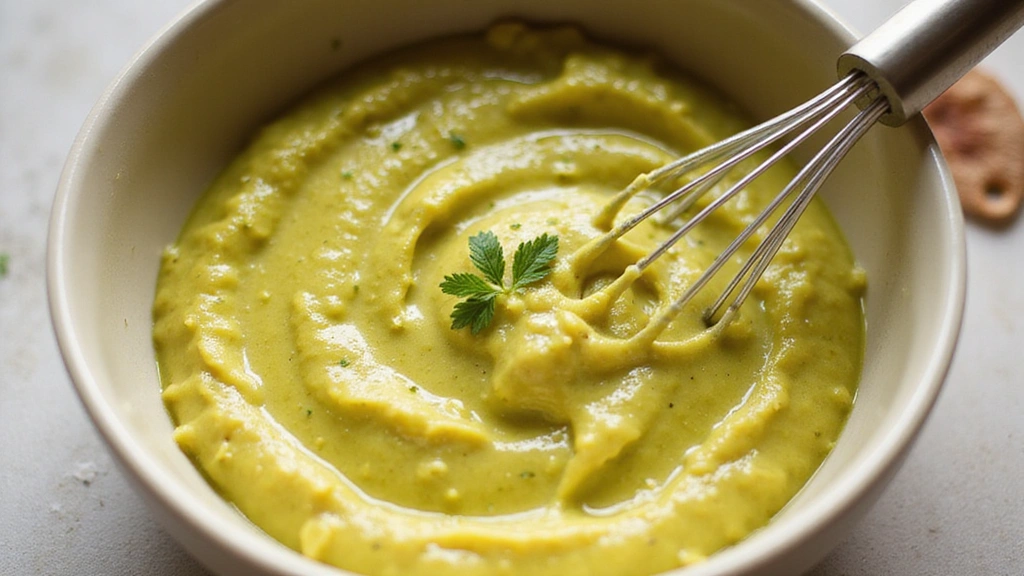
Give the aioli a final whisk to ensure all ingredients are well combined.
Check the consistency and adjust with oil or lemon juice if necessary.
Taste and make final seasoning adjustments.
The aioli should be glossy and hold its shape.
Critical Timing and Temperature Guide
Emulsification Process: Begin with room temperature ingredients to ensure a stable emulsion. Gradually add oil over 5-7 minutes, watching for a creamy consistency. Avoid adding oil too quickly to prevent separation.
Garlic Paste Preparation: Crush garlic for about 2-3 minutes until a smooth paste forms. Avoid large chunks, as they can affect texture and flavor consistency.
Whisking Technique: Maintain a steady whisking pace throughout the process. Adjust speed to prevent separation.
Pro Tips for the Creamiest Homemade Aioli
• Ingredient Selection: Use fresh, high-quality extra-virgin olive oil and organic garlic to ensure the best flavor.
• Preparation Secret: Allow egg yolks to reach room temperature before starting to aid in smooth emulsification.
• Temperature Management: Maintain room temperature for all ingredients to keep the emulsion stable.
• Texture Enhancement: Whisk vigorously and consistently to achieve the ideal creamy texture.
• Flavor Layering: Incorporate lemon juice gradually to build a complex, balanced flavor profile.
• Make-Ahead Strategies: Prepare aioli up to one day in advance, storing in an airtight container in the refrigerator.
• Restaurant-Quality Finishing Touches: Add a sprinkle of freshly chopped herbs like parsley or chives before serving for a professional touch.
• Equipment Optimization: Use a balloon whisk for maximum efficiency in emulsifying the aioli.
Troubleshooting Common Issues
• Aioli Too Thin: If the mixture is too runny, slowly whisk in more oil until it thickens. Ensure all ingredients are at room temperature before starting.
• Separation During Emulsification: If the emulsion breaks, start a new base with a fresh egg yolk and gradually incorporate the broken mixture.
• Overpowering Garlic Flavor: Balance by adding a touch more lemon juice and a pinch of sugar to mellow the intensity.
• Emulsion Will Not Form: Ensure you're whisking vigorously and not adding oil too quickly. Restart with a new yolk if necessary.
• Grainy Texture: This can occur if oil is added too quickly. Restart with a new yolk and slowly incorporate the aioli to smooth it out.
Variations and Regional Differences
• Spanish Alioli: This version uses only garlic, olive oil, and salt, skipping eggs entirely for a purer garlic flavor.
• French Aioli: Often includes Dijon mustard and is served with poached fish or seafood, reflecting French culinary techniques.
• Provençal Aioli: Features herbs like thyme or basil, adding a floral note unique to the Provence region.
• Italian Aioli: Incorporates lemon zest and anchovy paste for added depth and a Mediterranean twist.
Food Science Behind the Recipe
• Emulsification Science: Understanding how oil and water combine to form a stable emulsion is key to aioli. The lecithin in egg yolks acts as an emulsifier, binding the ingredients.
• Garlic Chemistry: Crushing garlic activates alliinase, which converts alliin to allicin, enhancing flavor.
• Oil Viscosity: The thickness of olive oil affects the emulsification process. High-quality oils with balanced viscosity result in a smoother aioli.
Frequently Asked Questions
What's the most common mistake people make when preparing aioli? Adding oil too quickly, causing the emulsion to break.
Can I use a blender instead of a whisk? Yes, but be cautious to blend at a low speed to avoid overheating and separating the mixture.
How long does homemade aioli last? It can be stored in an airtight container in the refrigerator for up to 3 days.
What if my aioli is too strong? Balance the flavor by adding a bit more lemon juice or sugar to soften the garlic's intensity.
Can I freeze aioli? Freezing is not recommended as it can alter the texture and cause separation.
Is aioli safe to eat with raw eggs? Use pasteurized eggs if concerned about food safety, or try a cooked yolk variation.
Why is my aioli turning out yellow? This is due to the quality and color of the olive oil used. Choose a lighter olive oil for a paler aioli.
Serving and Presentation Guide
• Traditional Presentation: Serve in a small, shallow bowl, garnished with a sprig of parsley or a slice of lemon.
• Modern Plate Art: Drizzle in a zigzag pattern over grilled vegetables or seafood for a contemporary touch.
• Family Style: Offer alongside a platter of fresh bread and assorted vegetables, inviting guests to dip and enjoy.
• Fine Dining: Present a quenelle of aioli atop a delicate fish fillet, accompanied by decorative microgreens.
Conclusion
Crafting the perfect homemade aioli is a rewarding culinary journey that enhances any meal.
With this comprehensive guide, you're equipped with the knowledge and techniques to master this classic sauce.
I encourage you to experiment and make this recipe your own, bringing a taste of the Mediterranean to your table.


This aioli recipe sounds amazing! I can already imagine it on my fries. Do you think it would work well with sweet potatoes too?
I tried making aioli last week, and let’s just say, my blender was not as excited about it as I was! What’s the funniest kitchen disaster you’ve had?
Did you know that aioli originally comes from the Mediterranean? It’s like a little taste of sunshine on your plate! Who else loves trying out different flavors?
Absolutely, Anh Tuấn! Aioli really does bring that vibrant Mediterranean flair to any dish. Experimenting with different flavors is such a fun way to elevate the experience. What unique twists on aioli have you tried?