
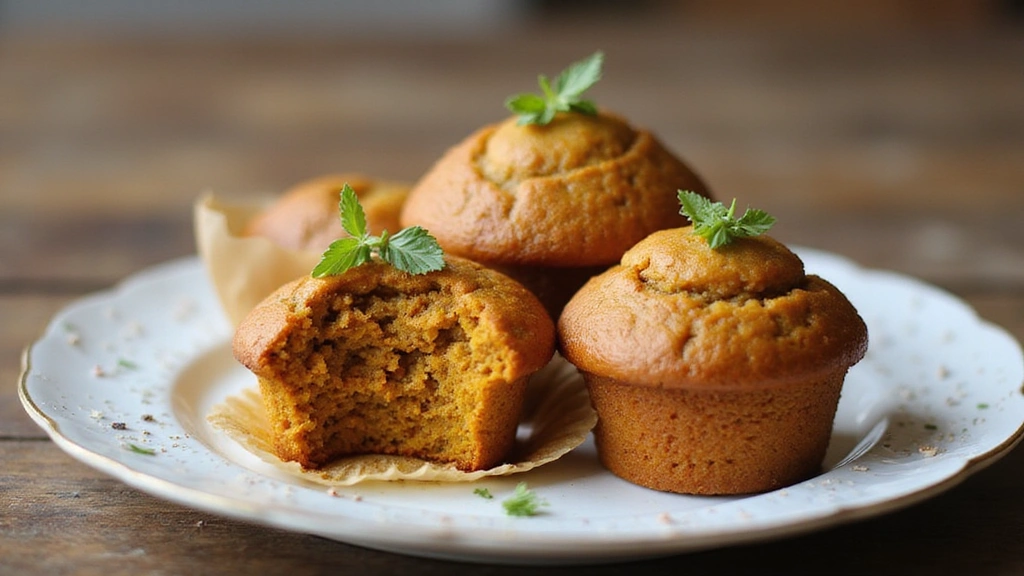
How to Make Irresistible Gluten-Free Pumpkin Muffins for Fall
As the leaves turn and the air becomes crisp, nothing says fall quite like the aroma of freshly baked pumpkin muffins wafting through your kitchen.
These irresistible gluten-free pumpkin muffins are the perfect blend of warm spices and the natural sweetness of pumpkin, making them a delightful treat for any autumn occasion.
I first stumbled upon this recipe during a family gathering, where my aunt shared her secret to creating moist, flavorful muffins that everyone raved about.
Whether enjoyed with a morning cup of coffee or as an afternoon snack, these muffins are sure to bring comfort and joy to your fall festivities.
The History and Cultural Significance
• Irresistible Gluten-free Pumpkin Muffins For Fall trace their origins to North America, where pumpkin has been a staple since the Native Americans cultivated it.
• The dish evolved as gluten-free baking gained popularity, allowing those with dietary restrictions to enjoy this seasonal favorite.
• In the United States, pumpkin muffins traditionally appear during Thanksgiving celebrations and harvest festivals, symbolizing abundance and gratitude.
• While many variations exist, the authentic gluten-free version maintains its moist texture and rich flavor, setting it apart from standard muffin recipes.
Recipe Overview
Nutritional Information (per serving)
Ingredients
Essential Equipment Guide
Mixing Bowl: A sturdy mixing bowl is crucial for combining your dry and wet ingredients without making a mess. Look for one that is large enough to hold all your muffin batter and is dishwasher safe for easy cleanup.
Muffin Tin: A good quality muffin tin ensures even baking and browning. Opt for a non-stick or silicone variety for easy muffin release and cleanup.
Measuring Cups and Spoons: Accurate measurements are key in baking. Invest in a set of dry and liquid measuring cups for precision, ensuring your muffins turn out just right.
Preparation Methods
Whisking: Proper whisking is essential to combine dry ingredients evenly. Ensure your dry ingredients are thoroughly mixed to avoid clumps, which will result in a more uniform muffin texture. Use a whisk instead of a spoon for the best results.
Folding: This technique is crucial for gently incorporating wet ingredients into dry without deflating the batter. Use a spatula to lift and fold the mixture, working in a circular motion until just combined. Be careful not to overmix, as this can lead to dense muffins.
Baking: Preheat your oven for even cooking. Ensure your oven is fully preheated before placing the muffins inside. This helps them rise properly and develop a nice dome shape.
Step 1: Preheat Oven

Start by preheating your oven to 350°F (175°C).
This ensures that the muffins bake evenly from the moment they are placed inside.
A properly preheated oven is crucial for achieving the perfect rise in your muffins.
Take the time to let it reach the right temperature before baking.
Step 2: Prepare Muffin Tin
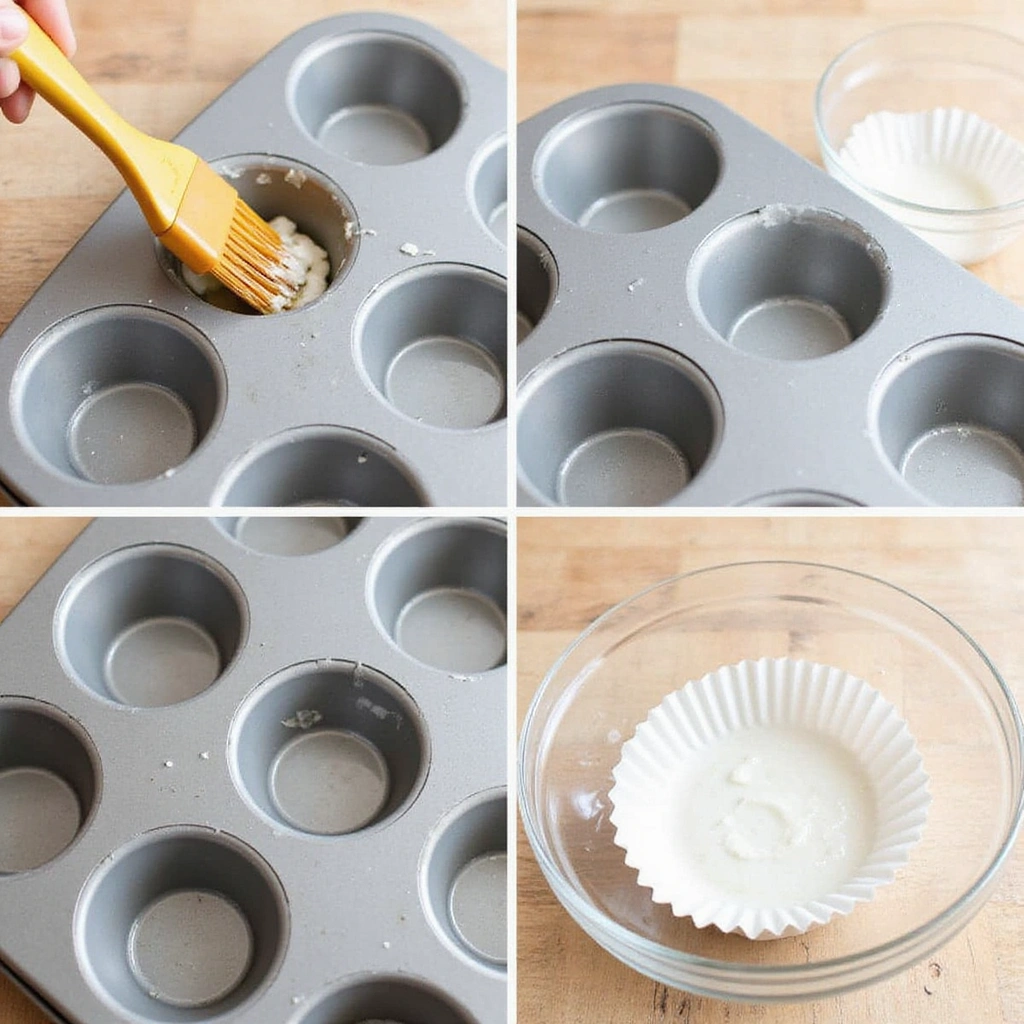
Grease your muffin tin with coconut oil or line it with paper liners.
This prevents the muffins from sticking and makes for easy removal.
Make sure to cover each cup thoroughly for the best results.
If using liners, ensure they are properly placed to hold the muffin batter.
Step 3: Mix Dry Ingredients
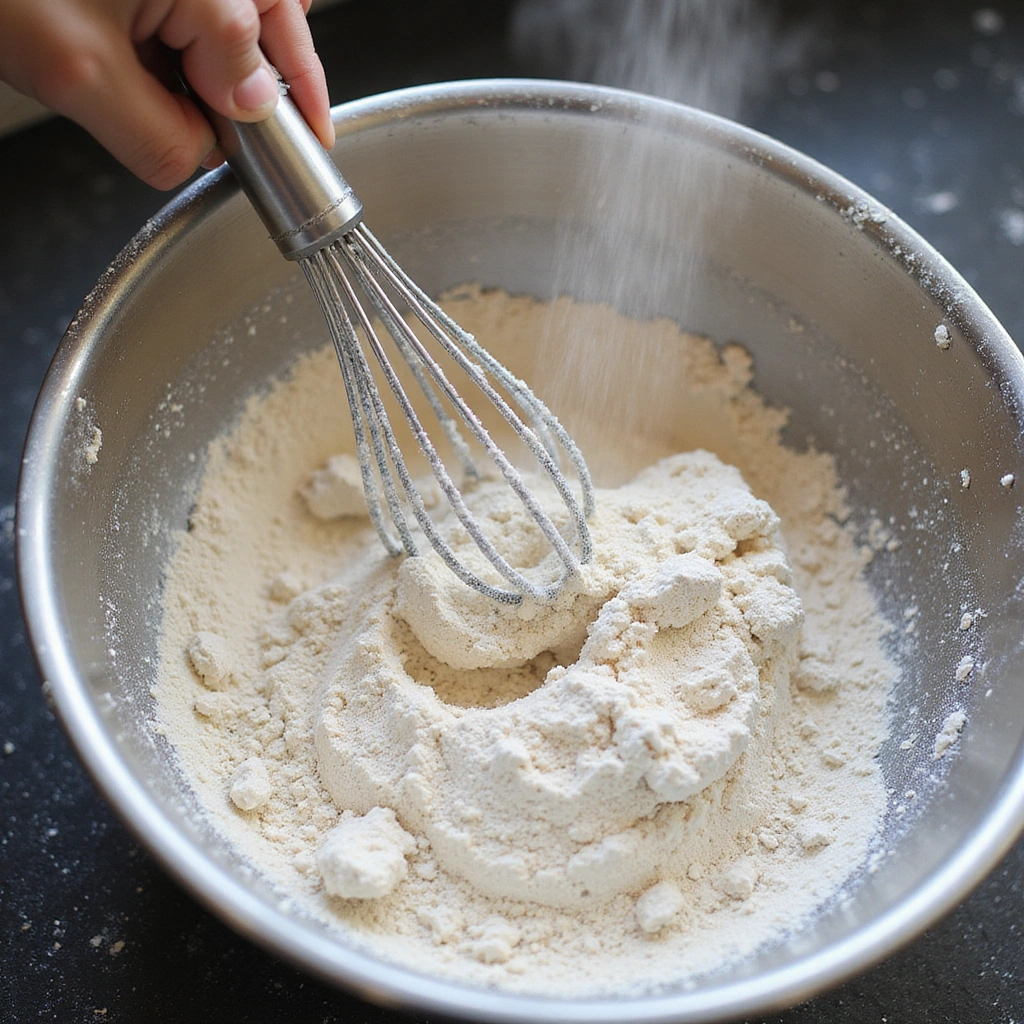
In a large mixing bowl, combine the gluten-free flour, baking powder, baking soda, salt, cinnamon, nutmeg, and sugar.
Use a whisk to ensure all dry ingredients are evenly distributed.
This step is crucial for proper leavening and flavor distribution.
Look for a consistent mixture with no clumps before moving on.
Step 4: Combine Wet Ingredients
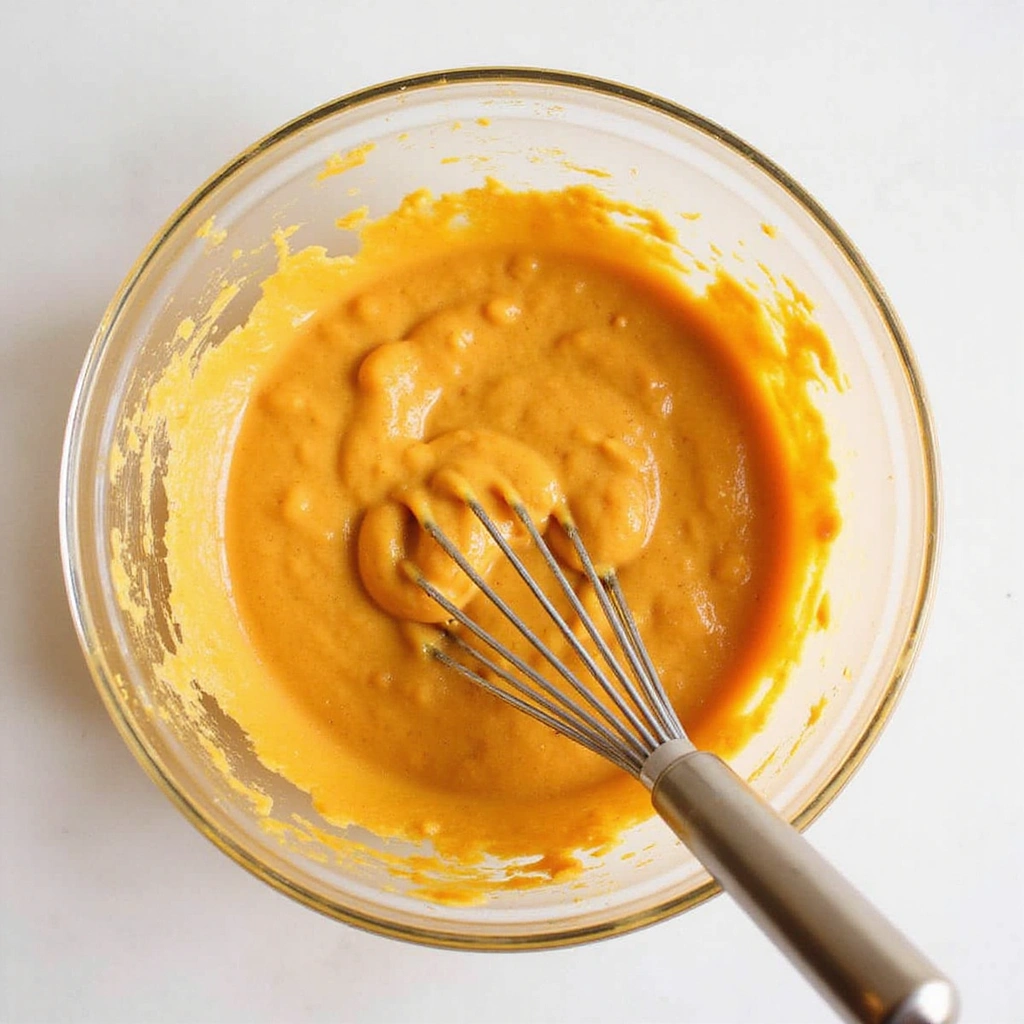
In another bowl, mix the pumpkin puree, coconut oil, maple syrup, and eggs until well combined.
Whisking these ingredients together incorporates air for a fluffy muffin texture.
Be sure to blend until smooth with no visible oil separation.
This mixture should appear creamy and uniform.
Step 5: Fold Wet into Dry
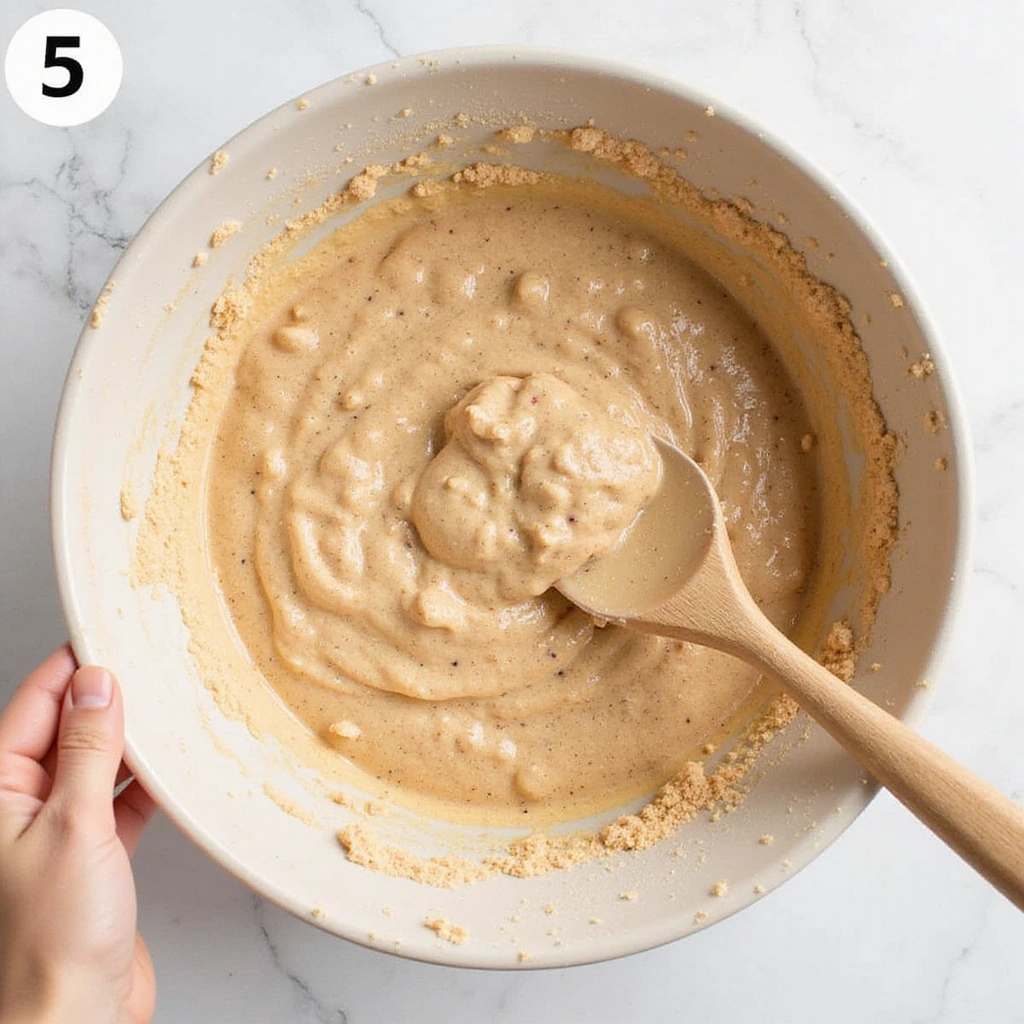
Gently fold the wet ingredients into the dry mixture using a spatula.
This should be done carefully to avoid overmixing, which can lead to dense muffins.
Look for just combined batter with a few flour streaks remaining.
Stop mixing as soon as you achieve a cohesive batter.
Step 6: Add Toppings
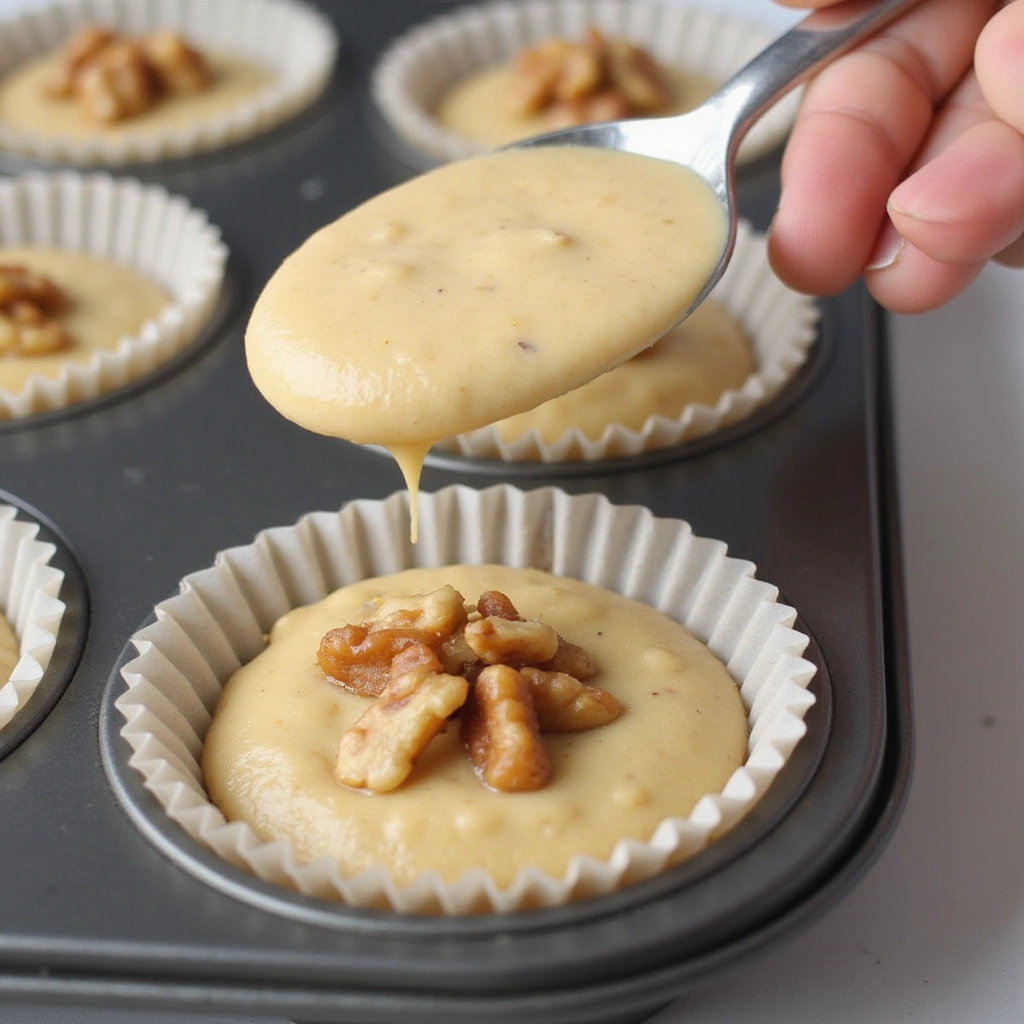
Spoon the muffin batter into the prepared muffin tin, filling each cup about two-thirds full.
Sprinkle chopped walnuts and a dash of cinnamon on top of each muffin before baking.
This adds texture and flavor to the muffins.
Make sure the toppings are evenly distributed for consistent taste.
Step 7: Bake Muffins
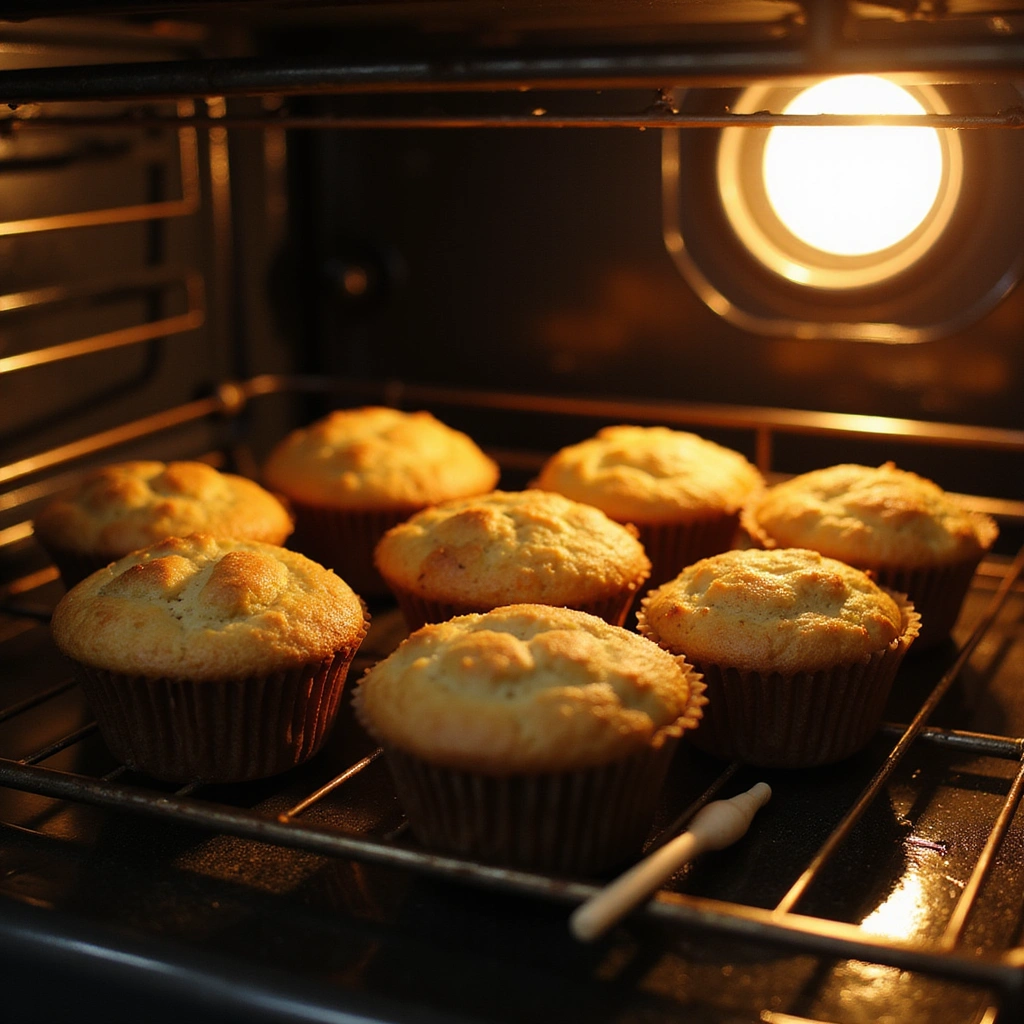
Place the muffin tin in the preheated oven and bake for 18-20 minutes.
Check for doneness by inserting a toothpick into the center; it should come out clean.
Look for a golden-brown color on the tops of the muffins.
Avoid opening the oven door too soon to maintain temperature.
Step 8: Cool and Serve
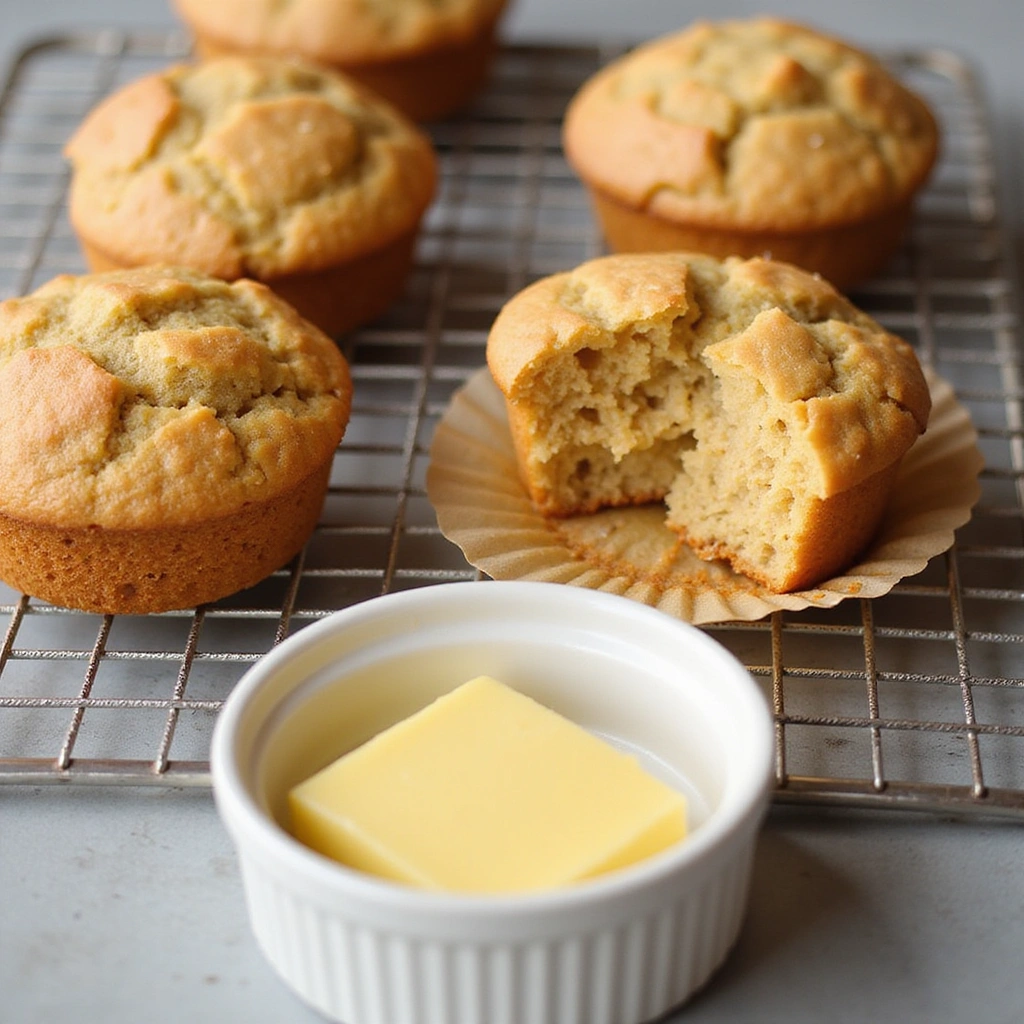
Once baked, remove the muffins from the oven and let them cool in the tin for 5 minutes.
Then transfer them to a wire rack to cool completely.
This prevents them from becoming soggy and helps maintain their texture.
Serve warm with a pat of butter or your favorite spread.
Critical Timing and Temperature Guide
Baking: Bake muffins at 350°F (175°C) for 18-20 minutes, until golden brown. They are done when a toothpick inserted into the center comes out clean. Common mistakes include under-baking, which leads to wet centers, and over-baking, resulting in dry muffins.
Cooling: Allow muffins to cool in the pan for 5 minutes before transferring to a wire rack. This helps them firm up without becoming soggy. Avoid leaving them in the pan for too long, as they may steam and lose their texture.
Preheating: Always preheat your oven to 350°F (175°C). An unheated oven can lead to uneven baking and flat muffins. Use an oven thermometer to ensure accuracy.
Pro Tips for Irresistible Gluten-free Pumpkin Muffins For Fall
• Ingredient Selection: Use high-quality pumpkin puree for the best flavor. Canned pumpkin works well, but fresh pumpkin can elevate your muffins significantly.
• Preparation Secret: Let your eggs and coconut oil come to room temperature before mixing. This ensures better emulsification and a smoother batter.
• Temperature Management: Always preheat your oven. A consistent temperature helps your muffins rise and bake evenly.
• Texture Enhancement: For extra fluffiness, sift your gluten-free flour before measuring. This incorporates air and helps prevent dense muffins.
• Flavor Layering: Consider adding a teaspoon of vanilla extract for a subtle depth of flavor that pairs beautifully with pumpkin.
• Make-Ahead Strategies: Prepare the batter ahead of time and store it in the fridge for up to 24 hours. Bake just before serving for warm, fresh muffins.
• Restaurant-Quality Finishing Touches: Dust the muffins with powdered sugar for an elegant presentation.
• Equipment Optimization: If using a silicone muffin pan, no grease is needed, and muffins slide out easily!
Troubleshooting Common Issues
• Texture Too Dense: This often occurs from overmixing the batter or using too much flour. To prevent this, fold the wet and dry ingredients until just combined. If this happens, add a splash of almond milk to lighten the batter.
• Muffins Not Rising: If your muffins are flat, check your baking powder and baking soda’s freshness. If they are expired, they won’t leaven properly. Always store them in a cool, dry place.
• Dry Muffins: Overbaking can lead to dry muffins. Keep an eye on them towards the end of the baking time and perform the toothpick test early.
• Uneven Baking: If some muffins bake faster than others, rotate the muffin tin halfway through the baking time. This ensures even heat distribution.
• Flavor Lacking: If the muffins taste bland, consider adding spices like ginger or cloves for a flavor boost. Adjusting the sugar can also enhance overall sweetness.
Variations and Regional Differences
• Mexican Chocolate Pumpkin Muffins: This variation includes cocoa powder and a pinch of cayenne pepper for a spicy kick. The addition of chocolate chips complements the pumpkin beautifully.
• Maple Pecan Pumpkin Muffins: Incorporating chopped pecans and a maple glaze gives these muffins a delightful crunch and sweetness.
• Vegan Pumpkin Muffins: Replace eggs with flax eggs and use almond milk instead of coconut oil for a dairy-free option. This version remains just as moist and flavorful.
• Modern Interpretations: Consider making mini muffins or using a doughnut pan for a fun twist on the traditional muffin shape.
Food Science Behind the Recipe
• Leavening Agents: Baking powder and baking soda work together to create carbon dioxide bubbles that help the muffins rise. Understanding their roles can help you adjust the recipe for different altitudes.
• Moisture Balance: Pumpkin puree adds moisture and acts as a binder. This is crucial in gluten-free baking, where traditional binders like gluten are absent.
• Flavor Development: The Maillard reaction occurs during baking, enhancing flavors and creating a golden-brown crust. Proper oven temperature is key to achieving this effect.
Frequently Asked Questions
What’s the most common mistake people make when preparing gluten-free pumpkin muffins? The top mistake is not measuring the gluten-free flour accurately. Use a kitchen scale for the best results.
Can I prepare components of this dish in advance? Yes, you can mix the dry ingredients ahead of time and store them in an airtight container for up to a week.
How do I adapt this recipe for dietary restrictions? To make it vegan, replace the eggs with flaxseed or chia seed eggs.
What’s the best way to store and reheat leftovers? Store muffins in an airtight container at room temperature for up to 3 days. Reheat in the microwave for 10-15 seconds.
Can I freeze this dish? Yes, freeze muffins in a zip-top bag for up to 3 months. Thaw at room temperature or microwave for a quick warm-up.
What wine or beverages pair best with this dish? A light, fruity white wine like Riesling pairs beautifully with the spices in the muffins.
How can I scale this recipe up for a crowd? To double the recipe, simply multiply all ingredients by two and ensure you have enough muffin tins on hand.
What side dishes complement this recipe best? A warm cup of spiced chai or coffee pairs wonderfully with these muffins, enhancing the fall flavors.
How do professional chefs elevate this dish for restaurant service? Professional chefs often serve muffins with flavored butters or homemade jams for an upscale touch.
Serving and Presentation Guide
• Traditional Presentation: Serve muffins warm on a rustic wooden platter, garnished with a sprinkle of cinnamon or powdered sugar for a homey feel.
• Modern Plating Ideas: Arrange muffins on a slate board with small bowls of flavored butter or jams for a contemporary touch.
• Accompaniment Suggestions: Pair with spiced coffee or herbal tea for a cozy fall experience.
• Special Occasion Presentation: For gatherings, display muffins on tiered stands with seasonal decorations, such as small pumpkins or autumn leaves.
Conclusion
These gluten-free pumpkin muffins are the perfect way to celebrate the flavors of fall.
I encourage you to try this recipe and share it with friends and family.
With their delightful taste and warm spices, they are sure to become a seasonal favorite in your home.


These pumpkin muffins sound amazing! I love baking in the fall, but I always end up with flour everywhere. Do you have any tips for keeping the kitchen a little cleaner while baking?
I tried making gluten-free muffins once, and let’s just say they turned into hockey pucks! Now I stick to recipes like this one—what a difference! Why did the muffin go to school? Because it wanted to be a smartie!
Thanks for sharing your experience, Rahul! It’s amazing how the right recipe can make all the difference. And love the joke-definitely brings a smile! 🍂🧁
Did you know that pumpkin is actually a fruit? I had no idea until recently! Makes me feel a little better about eating so many pumpkin treats!
I remember the first time I tried to make gluten-free muffins, they were more like mini doorstops! But practice makes perfect, right? Now I can’t wait to try your recipe this weekend!